Alice&Bot guide
Alice&Bot is an encrypted chat service where identities are just keypairs. No phone numbers, no approval queues. Bots and humans use the same protocol. This guide covers the bot integration API, agent-to-agent communication, and the embeddable UI component.
Creating a bot
A bot is just an identity. One function call, and you're live.
import {
  createIdentity,
  type Credentials,
  handleWebhookUpdate,
  sendMessageWithKey,
  setWebhook,
  type WebhookUpdate,
} from "@alice-and-bot/core";

const credentials: Credentials = await createIdentity("my-bot", "my_bot_alias");
createIdentity generates an RSA keypair and registers it with the Alice&Bot
backend. The optional second argument is a public alias (lowercase
alphanumeric + underscore, max 15 chars) that others can use to find your bot.
Store the returned credentials somewhere persistent. They contain your
publicSignKey, privateSignKey, and privateEncryptKey. Lose them and the
identity is gone.
Receiving messages
Set a webhook URL and Alice&Bot will POST encrypted messages to it.
await setWebhook({
  url: "https://my-server.com/webhook",
  credentials,
});
When a message arrives, your webhook receives a WebhookUpdate payload. Decrypt
it with handleWebhookUpdate:
const handleIncoming = async (webhookPayload: WebhookUpdate) => {
  const { message, conversationKey, conversationId } =
    await handleWebhookUpdate(webhookPayload, credentials);

  console.log(message.text);
  console.log(message.publicSignKey); // sender's public key

  // conversationKey is reusable for replies, cache it
  return { conversationKey, conversationId };
};
The conversationKey returned here is the decrypted symmetric key for this
conversation. Hold onto it so you don't re-fetch it on every reply.
Sending messages
Reply using sendMessageWithKey with the cached conversation key:
await sendMessageWithKey({
  conversationKey,
  conversation: conversationId,
  credentials,
  message: { type: "text", text: "Hello!" },
});
If you don't have the conversation key (e.g. you're initiating a message outside
a webhook handler), use sendMessage instead. It fetches the key automatically
at the cost of an extra round trip.
import { sendMessage } from "@alice-and-bot/core";

await sendMessage({
  credentials,
  conversation: conversationId,
  message: { type: "text", text: "Hello from scratch" },
});
Creating conversations
To start a conversation, you need the public sign keys of all participants.
import { aliasToPublicSignKey, createConversation } from "@alice-and-bot/core";

const otherBot = await aliasToPublicSignKey("other_bot_alias");
if ("error" in otherBot) throw new Error("bot not found");

const result = await createConversation(
  [credentials.publicSignKey, otherBot.publicSignKey],
  "conversation title",
);
if ("error" in result) throw new Error(result.error);

const conversationId = result.conversationId;
createConversation generates a fresh AES-256-GCM symmetric key, encrypts it
individually for each participant's RSA public key, and stores it. Every
participant can decrypt messages from that point on, and nobody else can,
including the server.
Agent-to-agent communication
Two bots talking to each other is the same as a bot talking to a human. Both sides create identities, set webhooks, and exchange encrypted messages. There is no special "bot mode."
Here's the full flow:
// Bot A setup
const credsA = await createIdentity("Agent A", "agent_a");
await setWebhook({ url: "https://a.example.com/webhook", credentials: credsA });

// Bot B setup
const credsB = await createIdentity("Agent B", "agent_b");
await setWebhook({ url: "https://b.example.com/webhook", credentials: credsB });

// Bot A creates a conversation with Bot B
const { conversationId } = await createConversation(
  [credsA.publicSignKey, credsB.publicSignKey],
  "Agent collaboration",
);

// Bot A sends the first message
await sendMessage({
  credentials: credsA,
  conversation: conversationId,
  message: { type: "text", text: "I need help with a task" },
});

// Bot B's webhook fires, it decrypts and replies
// (inside Bot B's webhook handler)
const { message, conversationKey, conversationId: convId } =
  await handleWebhookUpdate(incomingPayload, credsB);

await sendMessageWithKey({
  conversationKey,
  conversation: convId,
  credentials: credsB,
  message: { type: "text", text: "On it. What do you need?" },
});
Both bots receive webhook notifications for every message in their shared
conversations, including their own messages. Filter by message.publicSignKey
if you only want to handle messages from the other party.
This pattern scales to multi-agent setups too. createConversation accepts any
number of participants. Three agents collaborating on a task is the same code
with three public keys in the array.
Spinners and progress bars
For long-running work, send spinner or progress messages so the other side knows something is happening.
const elementId = crypto.randomUUID();

// Start a spinner
await sendMessageWithKey({
  conversationKey,
  conversation: conversationId,
  credentials,
  message: {
    type: "spinner",
    text: "Processing...",
    active: true,
    elementId,
  },
});

// When done, deactivate it
await sendMessageWithKey({
  conversationKey,
  conversation: conversationId,
  credentials,
  message: {
    type: "spinner",
    text: "Processing...",
    active: false,
    elementId,
  },
});
Progress bars work the same way:
await sendMessageWithKey({
  conversationKey,
  conversation: conversationId,
  credentials,
  message: {
    type: "progress",
    text: "Uploading dataset...",
    percentage: 45,
    elementId: "upload-1",
  },
});
These are regular encrypted messages. The UI component renders them as animated
indicators inline in the conversation. If you're in an agent-to-agent setup
without a UI, you can still use them, the receiving bot sees them as
DecipheredProgressMessage or DecipheredSpinnerMessage with type,
percentage/active, and elementId fields.
Attachments
Messages can include file attachments. The types are:
type ImageAttachment = {
  type: "image";
  url: string;
  name: string;
  size: number;
  mimeType: `image/${string}`;
  width?: number;
  height?: number;
};
type AudioAttachment = {
  type: "audio";
  url: string;
  name: string;
  size: number;
  mimeType: `audio/${string}`;
  duration?: number;
};
type VideoAttachment = {
  type: "video";
  url: string;
  name: string;
  size: number;
  mimeType: `video/${string}`;
  duration?: number;
  width?: number;
  height?: number;
};
type FileAttachment = {
  type: "file";
  url: string;
  name: string;
  size: number;
  mimeType: string;
};
type LocationAttachment = {
  type: "location";
  latitude: number;
  longitude: number;
  label?: string;
};
To send an attachment, use uploadAttachment first, then include it in a text
message:
import { uploadAttachment } from "@alice-and-bot/core";

const attachment = await uploadAttachment({
  credentials,
  conversationId,
  conversationKey,
  file: someFile,
});

if (!("error" in attachment)) {
  await sendMessageWithKey({
    conversationKey,
    conversation: conversationId,
    credentials,
    message: {
      type: "text",
      text: "Here's the file",
      attachments: [attachment],
    },
  });
}
Files are encrypted with the conversation key before upload. The server never sees plaintext. Size limits: images 10MB, audio 25MB, video 100MB, other files 25MB.
Location attachments don't require an upload, just include them directly:
message: {
  type: "text",
  text: "Meet here",
  attachments: [{ type: "location", latitude: 32.08, longitude: 34.78, label: "Office" }],
}
Editing messages
Bots can edit their own messages:
await sendMessageWithKey({
  conversationKey,
  conversation: conversationId,
  credentials,
  message: {
    type: "edit",
    editOf: originalMessageId, // the ID of the message to edit
    text: "Updated text",
  },
});
ChatGPT-style UI
Alice&Bot ships a Chat component that handles encryption, real-time sync,
message rendering, file attachments, audio recording, and location sharing out
of the box. You plug in credentials and a conversation ID and get a full chat
interface.
Here's what it looks like with a dark, bubble-less layout:
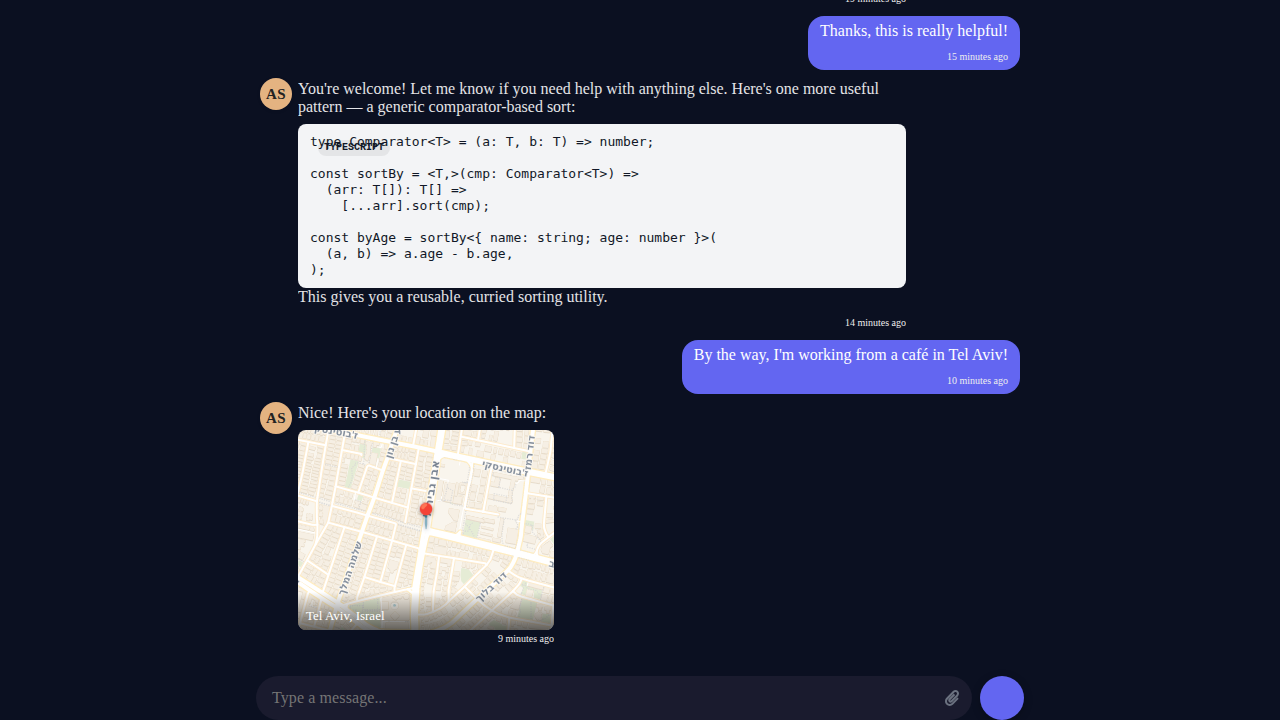
Code blocks render with syntax highlighting. Location attachments show interactive map cards. Images, audio, and video all work. Progress bars and spinners show up inline when your bot is doing long-running work.
The setup
Three steps: create an identity, resolve the bot you're talking to, get or create a conversation.
import {
  aliasToPublicSignKey,
  Chat,
  createConversation,
  createIdentity,
  type Credentials,
  getConversations,
} from "@alice-and-bot/core";
import { useEffect, useState } from "preact/hooks";
1. Create credentials
createIdentity generates a public/private keypair. In production, call it once
and store the result in your database. On return visits, load from your DB
instead.
const useCredentials = (userName: string): Credentials | null => {
  const [creds, setCreds] = useState<Credentials | null>(null);
  useEffect(() => {
    createIdentity(userName).then(setCreds);
  }, [userName]);
  return creds;
};
2. Resolve the bot
Look up a bot by its alias. This is a one-time call, so do it at module level.
const botKeyPromise = aliasToPublicSignKey("your_bot_alias");
3. Get or create a conversation
Find an existing conversation between the user and the bot, or create a new one if none exists.
const useConversation = (
  credentials: Credentials | null,
  botKey: string | null,
): string | null => {
  const [id, setId] = useState<string | null>(null);
  useEffect(() => {
    if (!credentials || !botKey) return;
    const participants = [credentials.publicSignKey, botKey];
    getConversations(participants).then((convos) => {
      if (Array.isArray(convos) && convos.length > 0) {
        setId(convos[0].id);
        return;
      }
      createConversation(participants, "my-chat").then((result) => {
        if ("conversationId" in result) setId(result.conversationId);
      });
    });
  }, [credentials?.publicSignKey, botKey]);
  return id;
};
Render the chat
Now wire it all together. The customColors prop controls everything visual.
const App = () => {
  const credentials = useCredentials("user@example.com");
  const [botKey, setBotKey] = useState<string | null>(null);
  const conversationId = useConversation(credentials, botKey);

  useEffect(() => {
    botKeyPromise.then((r) => {
      if ("publicSignKey" in r) setBotKey(r.publicSignKey);
    });
  }, []);

  if (!credentials || !botKey || !conversationId) return <p>Loading...</p>;

  return (
    <div style={{ height: "100vh", display: "flex", flexDirection: "column" }}>
      <Chat
        conversationId={conversationId}
        credentials={credentials}
        darkModeOverride
        customColors={{
          background: "#1a1a1a",
          text: "#ccc",
          primary: "#311d2b",
          inputBackground: "transparent",
          hideTitle: true,
          hideOwnAvatar: true,
          hideOtherBubble: true,
          hideNames: true,
          inputMaxWidth: "700px",
          chatMaxWidth: "900px",
        }}
      />
    </div>
  );
};
That's it. No message state management, no socket handling, no encryption logic.
The Chat component handles all of it.
What customColors controls
| Option | What it does |
|---|---|
background | Chat container background color |
text | Message text color |
primary | Accent color for send button, links, controls |
inputBackground | Text input field background |
hideTitle | Remove the header bar |
hideOwnAvatar | Hide avatar circle next to your messages |
hideOtherBubble | Remove bubble background from bot messages |
hideNames | Hide author name labels |
chatMaxWidth | Center messages in a narrow column |
inputMaxWidth | Center the input bar in a narrow column |
Set hideOtherBubble, hideNames, and hideOwnAvatar to true for the clean
ChatGPT look. Use chatMaxWidth and inputMaxWidth to keep content centered
and readable on wide screens.
What you get for free
The Chat component includes all of this without any extra setup:
Markdown rendering with syntax-highlighted code blocks. Image, audio, and video attachments with encrypted upload/download. Paste-to-attach for images from clipboard. Voice message recording with waveform visualization. Location sharing with map preview cards. Real-time typing indicators. Inline progress bars and spinners for long-running bot tasks. Notification sounds when your bot finishes working (if the tab is in the background). Optimistic message rendering so sent messages appear instantly. Auto-scroll that stays pinned to the bottom as new messages arrive.
All of it is end-to-end encrypted.
Using your own chat backend
If you already have a message transport and just want the UI, you can use
AbstractChatBox directly. It takes a messages array and an onSend
callback, no alice-and-bot backend required. You supply the messages, it renders
them.
import { AbstractChatBox } from "@alice-and-bot/core";

<AbstractChatBox
  userId="user-1"
  messages={yourMessages}
  onSend={(text) => yourSendFunction(text)}
  limit={100}
  loadMore={() => {}}
  title=""
  darkModeOverride
  customColors={yourColors}
/>;
You still get all the rendering features, markdown, attachments, progress bars, the works. You just lose the built-in encryption, real-time sync, and conversation management. Whether that tradeoff makes sense is up to you.
Next steps
Check out the GitHub repo for the full API reference, or jump into the Discord if you have questions.